Where to begin the process of migrating users over to onedrive?
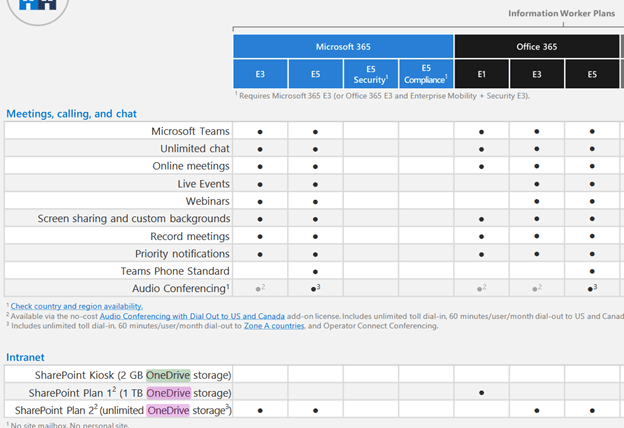
The user must be assigned an E3 or E5 license and Onedrive must be pre-provision before their files can be set up to continuously synced in the background. The guide will show how to achieve both. Once that is done, then we can proceed to deploy the Onedrive application to user’s workstation.
**There is an office 365 E1 license but that will only work with web based onedrive, excel, powerpoint, etc and not client side.
**We are not working with education office 365 licenses, that will entail different options and pricing as well as storage quote.
Goal: Assign E3 license to users in company domain and provision them via several ways. (The lab is set in a hybrid environment and AD Connect is configured to sync on premise users to Azure Active Directory)
Pre-Provision process:
A non-provision setup will look like this under the office 365 admin portal > active user > onedrive tab
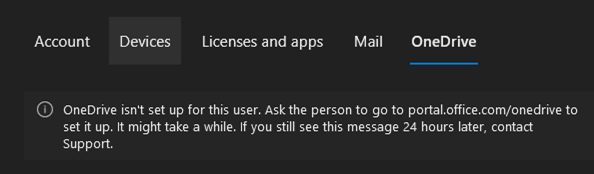
- In order for users to upload their files to OneDrive, the storage workspace must be provisioned and set up first before the workspace is available. Here are some ways that can be done:
1. A user can log into onedrive web portal at portal.office.com/onedrive manually.
2. The IT Admin can assign an E3/E5 license under licenses and apps per user. Provision should take place after its assigned.
3. For bulk license assignment:
Navigate to Microsoft 365 admin console > users > filter all the users that are unlicensed > manage product license > assign more
4. Create an azure security group, assign license to that group then place a group of users in there.
5. Script a large batch via sharepoint powershell module.
A) Copy and paste the email address and put it in a text file
user1@contoso.com
user2@contoso.com
user3@contoso.com
B) Open Powershell as admin, install the sharepoint module then connect to sharepoint.

Install-Module -Name Microsoft.Online.SharePoint.PowerShell
Update-Module -Name Microsoft.Online.SharePoint.PowerShell  [optional]
Connect-SPOService -Url https://0rhnp-admin.sharepoint.com

(**Replace the url from sharepoint admin console- remember to sign in with sharepoint admin or global admin account)

C) Once you are connected:
Run the PowerShell command Request-SPOPersonalSite, consuming the text file you previously created in Step 1

$users = Get-Content -path "C:\Users.txt"
Request-SPOPersonalSite -UserEmails $users

D) To verify that OneDrive has been created for your users:
Save the following text as a PowerShell file and place it on C:\temp folder.
__________________________________________________________
$TenantUrl = "https://0rhnp-admin.sharepoint.com"
$LogFile = [Environment]::GetFolderPath("Desktop") + "\OneDriveSites.log"
Connect-SPOService -Url $TenantUrl
Get-SPOSite -IncludePersonalSite $true -Limit all -Filter "Url -like '-my.sharepoint.com/personal/'" | Select -ExpandProperty Url | Out-File $LogFile -Force
Write-Host "Done! File saved as $($LogFile)."
__________________________________________________________

Open Powershell as admin and execute the file:

       Powershell.exe  c:\temp\users.ps1

It will generate a file called "OneDriveSites.log" that gets saved to current desktop folder. Inside the .log will review user's share point path.

**Alternative way to view sharepoint addresses is from the 365 admin panel:
M365 admin center > reports > usage > OneDrive
https://admin.microsoft.com/#/reportsUsage/OneDriveSiteUsage
Go to 365 admin panel > billing > licenses > export list of all users with E3 license
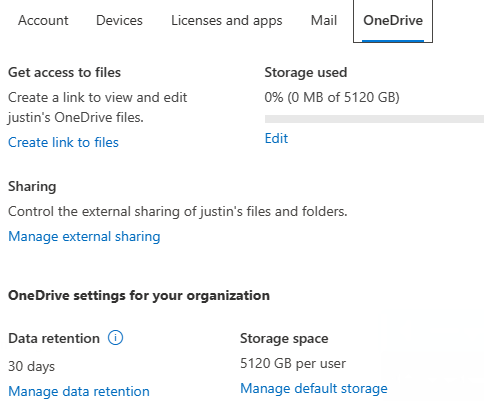
Result: Once we are done with assigning license to user, they will get provisioned and this will appear under OneDrive section – we are done with one user. I recommend creating a group and put users in a azure ad group that has a license assigned to it.