
If the users are set up with folder redirection, which involves redirecting their local files (Desktop, Documents, pictures) to a network share, this guide will assist you in transitioning these users to OneDrive. The process involves utilizing file share migration tool in SharePoint admin center.
Goal– migrate user’s on-premises file share to SharePoint. The destination will be SharePoint root folder which will be under users\documents. The process will be a copy and NOT a move. No files will disappear from the network share once the migration is complete.
1. Obtain access to the server that are hosting the network share for folder redirection. In this lab, my server will be [Mecm2].
A) Create service account [john@blue929.com] on on-premises AD. Once the service account gets synced to Azure AD, assign the role of SharePoint administrator.
B) The file share location is in mecm2 [\\mecm2\onedrive-stuff]
- Create a service account, the account [John@blue929.com] needs to have access to the premise file share
- put john in local admin group and make sure the group has READ access to [onedrive-stuff]
- Verify access to file share by navigating to UNC path as John.
- We will work with only one agent in this lab. Set up multiple vm agent if folders are large to prevent network bottleneck.
2. Once the azure role and permission granted to the file share for the service account, it is time to spin up a second server and load the migration agent inside. The server is only temporary and is used for scanning the [onedrive-stuff] share in [Mecm2] and copying those files over to OneDrive. This server acts as a middleman. We will log into this server with the service account [John@blue929.com]. Feel free to install the agent on the same server hosting the share.
Files share (\\mecm2\OneDrive-Stuff) ——–> AD-Connect (migration agent) ———> OneDrive
A) Go to SharePoint portal > download agent. Install agent on [AD-Connect], log in using the service account [John].


3. After agent is installed, from Sharepoint Admin center > file share > under the agent tab, there should be a green check.

A) Go back to SharePoint admin center add a source path

B) List the source path for the redirected folder for user, Alex. [\\mecm2\onedrive-stuff\Alex].

C) The agent will scan the file share and provide a result of whether it is ready for migration. After the source path is added, SharePoint will have all the info for the file.

D) Start a migration job by going to Migration tab > add task > select source OR select the scanned path and select > copy to migrations.

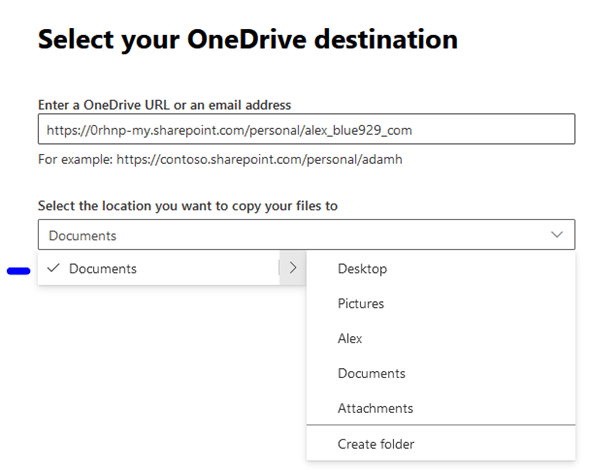
E) Since we already have the source, select OneDrive as destination.

** Get a list of sharepoint url here: M365 admin center > reports > usage > onedrive

https://admin.microsoft.com/#/reportsUsage/OneDriveSiteUsage

If the view generates a list of random numbers, it means the report is concealed to hide the info.  In this case, search reports under the search bar in office 365 admin center and uncheck "Display concealed user, group and site names in all reports."

**Highly recommend to just select the root folder, which is Documents for folder redirected user. Since folder redirection already created a desktop and documents folder. The Desktop and documents folder will be under root.
The root documents folder is this:

**If the source folder AND OneDrive has same folders [Attachments, Desktop, Documents, Picture]

It will NOT create new folder or duplicate copy. Instead, the files will move into the current Desktop/Doc folder in OneDrive!!

**If the source location has individual files (.pdf/doc/html,etc), all the files will be copied over as is. I suggest putting all the items from source in a folder before migration.
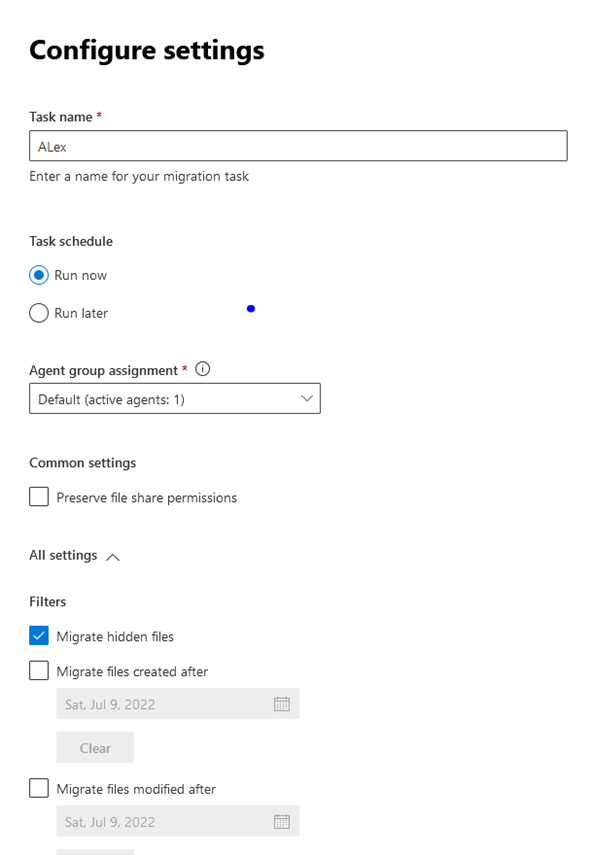
F) configure the settings to exclude files you preferred. Checkmark automatically rerun failed task up to 4 times if it encounters any errors. After that, click Run.

Under migrations > the job should show up.


Once it is complete, there should be a check mark. Check the details and review if all files are copied over.

Result: Now that all the files are moved over from the network share to OneDrive, the user might still be in the folder redirect group. Take the user out of the group if folder redirect is targeting that AD group or put the users in a different OU if folder redirect is set to target all domain users. Remove the folder redirect policy from the new OU but link over everything else.
I highly recommend the user sign into a new device or rebuild their user profile on current device in order to get the benefits of OneDrive SSO to work correctly.


Migration Limitations:
” * : < > ? / \ |
(Leading and trailing spaces in file or folder names also aren’t allowed.)
.lock, CON, PRN, AUX, NUL, COM0 – COM9, LPT0 – LPT9, _vti_, desktop.ini, any filename starting with ~$.
A file cannot exceed 250gb
Bulk Upload:
Copy the source and destination from the summary report to the sample template
Sample:

Info on filling out the columns:
Issue: Invalid CSV format.

Solution:
Erase the first row
Do not include a header row in your CSV file. The example shown above included headers to demonstrate the order of the fields.
Actual format-
The following format will copy over the [Alex] folder over to [Alex] folder created under document roots directory.

- If the files are opened during the migration process, they can copied and migrated over without issue.
- The migration will still go through even if the files are opened. Only the last edit will carry over.
- Strongly recommend that you do not rename or move migrated files before the final migration has been completed. Doing so will result in files being overwritten.
***I do NOT recommend modifying the folder redirection policy to redirect files back into local user profile then upload to OneDrive from there because this works half of the time and there is a risk of data loss. The files are actually moved and not copied back to local user profile. In order to finalize the migration, take the user off of folder redirection policy and sign them into a new workstation or rebuild their profile on existing workstation.
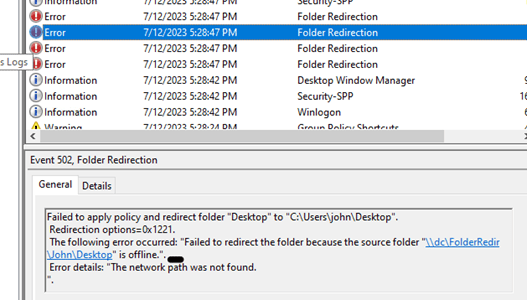
** IT Admin can either script the move back to local %userprofile% or configure a second folder redirection policy to move folders back. If this route is chosen, be aware that:
1. The files are only moved to the first machine that the user is signed into. If a user signs into a second machine, error 0x1221 may error with trouble finding network share.

2. Even if the files are moved over successfully,0x1220 may occur. Security ID error prevents the folder from being opened. If this happens, modify owner from system to user.


Source:
https://learn.microsoft.com/en-us/sharepointmigration/introducing-the-sharepoint-migration-tool
” target=”_blank” rel=”noreferrer noopener”>https://learn.microsoft.com/en-us/sharepointmigration/mm-fileshare-copy-to-migrations
https://learn.microsoft.com/en-us/answers/questions/589803/folder-redirection-to-onedrive-migration
https://www.enjoysharepoint.com/connect-sposervice-current-site-is-not-a-tenant-administration-site
